
Swiss GriP Non-Slip Installation Guide
Swiss GriP Non-Slip is the most used transparent non-slip coating world-wide. Our durable, Swiss-made coatings are CSIRO-certified and provide outstanding protection against slips and falls.
Download Swiss GriP Primer TDS: (Download PDF)
Download Swiss GriP Non-Slip TDS: (Download PDF)
Application Methods
– By Roller: continue with this installation guide
– By HVLP/Airless Sprayer: Swiss GriP can be applied by sprayers such as the Ozito 400W Power Sprayer, Wagner XVLP3500, or the Graco HVLP 9.0 ProContractor. Contact our customer service prior to apply Swiss GriP by spray gun.
- Swiss GriP is a water-based, non-dangerous coating. Read Data Sheet, Material Safety Data Sheet and any precautionary labels on containers.
- Surface and room temperature must be at least 15 degrees Celsius during application and drying. Do not apply in exterior situations when rain threatens. Do not apply when relative humidity is above 80% or is likely to go above 80% shortly after the application has been completed. Do not start application in the late afternoon.
- Practical spreading rates will vary depending on such factors as method and conditions of applications and surface roughness and porosity.
- Suitable for application over bare substrate and water based coatings without nano-effect.
- Consult Technical Data Sheet and Safety Data Sheet before usage. Latest version available via info@swissgrip.com.au.
Adhesion
Swiss GriP Non-Slip has excellent adhesion to a wide range of surfaces, especially in combination with the Swiss GriP Sopro Primer. Extra care should be taken when dealing with:
High Gloss Tiles: An adhesion check is compulsory for high gloss tiles. Some of these tiles have a repellent layer which prevents anything (including any other coatings) from sticking onto the tile. This effect is called a nano-finish.
Surfaces previously sealed: Some penetrating sealers such as oil- and solvent-based sealers have a repellent effect. Just like a nano-finish, these sealers prevent anything from sticking to the surface.
Check adhesion
- Masking Tape: Apply masking tape to the surface. The tape should stick well and not come off easily.
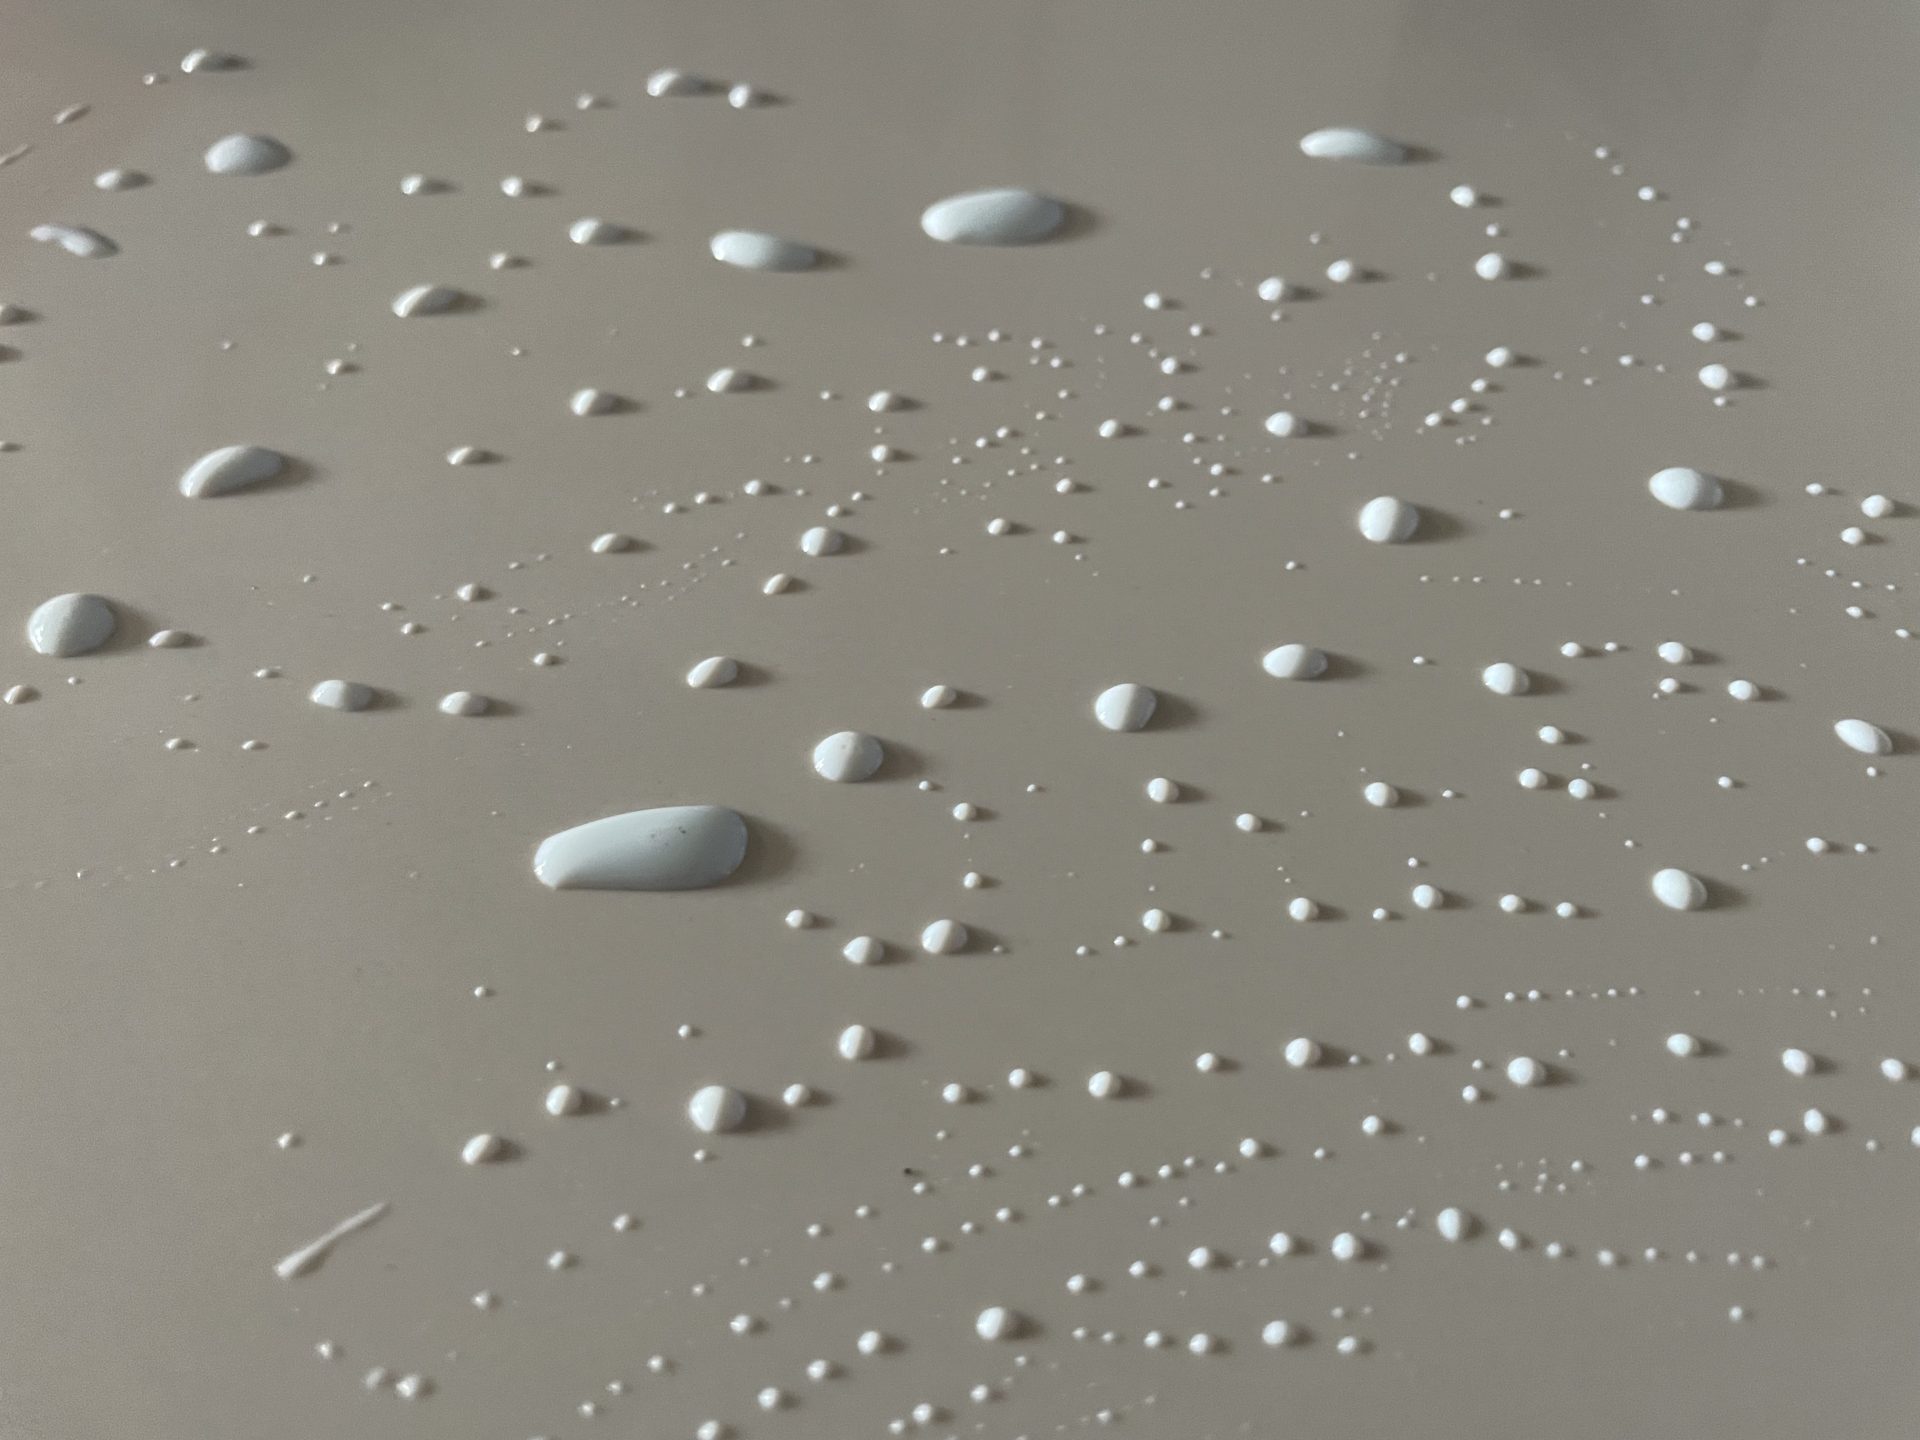
- Primer or Water Test: Apply primer or water to the surface. If the liquid beads up (primer retracts to smaller bubbles on the surface) the tile has a nano-effect and Swiss GriP should not be applied. Contact our customer service.
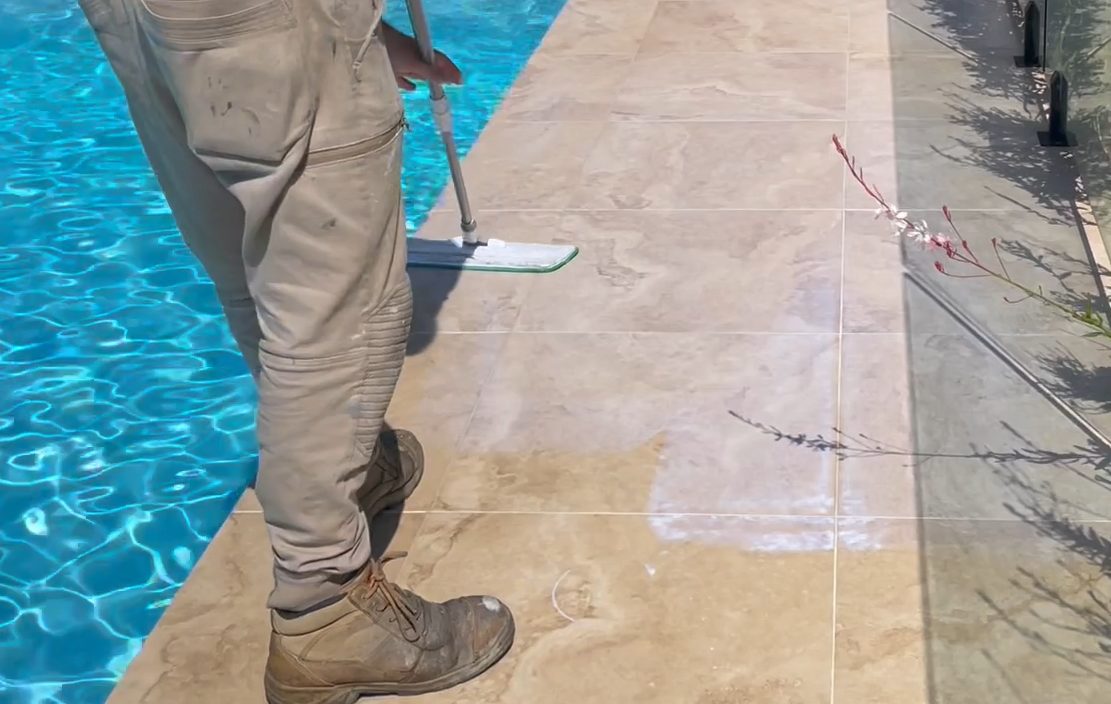
Step 1: Pre-Application Clean
Thoroughly clean the area using Swiss GriP Intensive Cleaner or another suitable floor cleaner in conjunction with water and a stiff bristled brush removing all dirt, dust and unwanted materials etc.
Remove contaminated water with a squeegee and wash/rinse clean until all foaming ceases. Ensure surface is thoroughly dry before starting the Swiss GriP application.
Ensure that previous coating is firmly bound to the substrate before applying a new coat. All loose and flaking paint/coats must be thoroughly removed prior to application.

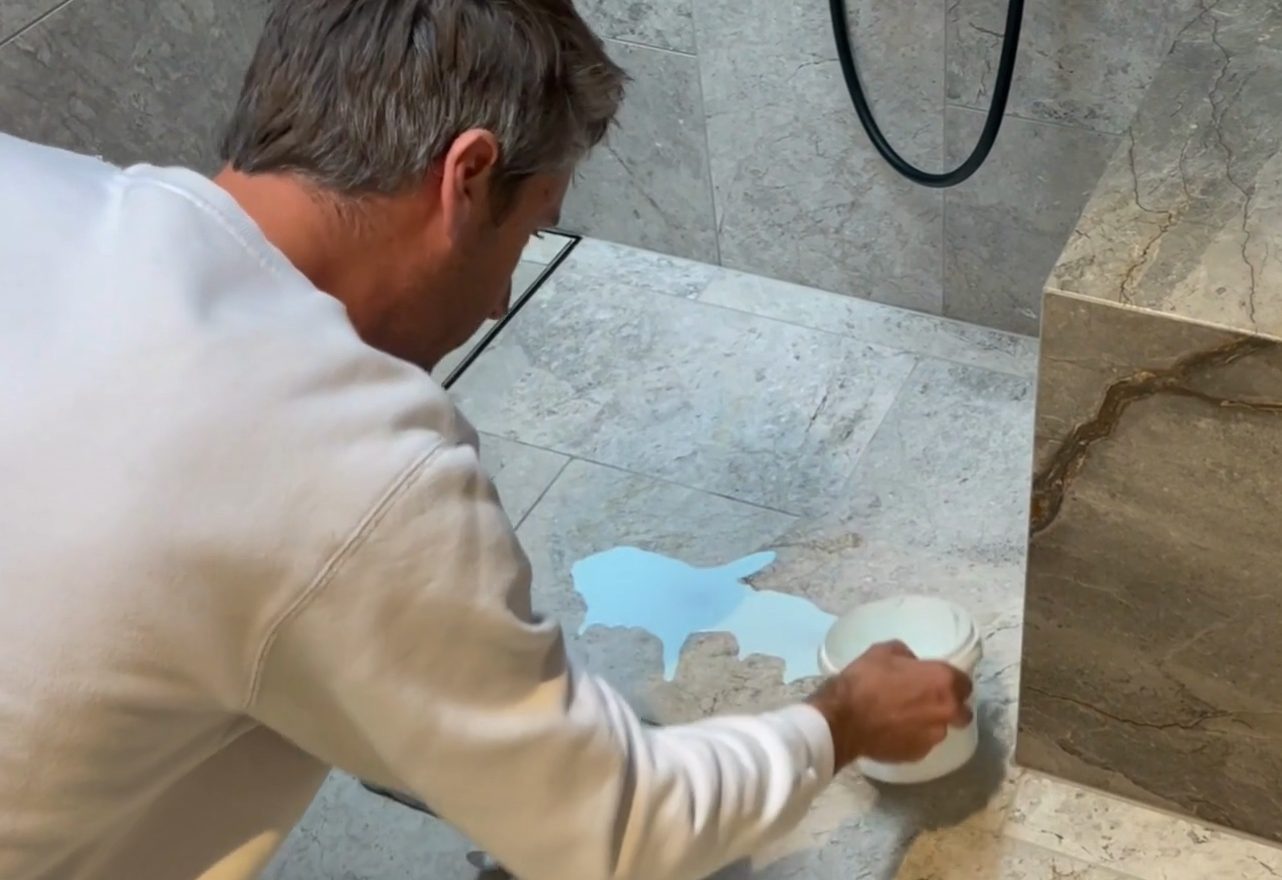
Step 2: Swiss GriP Primer
Swiss GriP Primer is a single-component synthetic primer. It is blueish in wet conditions, transparent when dry. Do not pour directly on porous / high suction substrates.
- Stir/shake prior to use.
- Dilute with water on a 1:1 ratio. Dilute less on high suctions substrates (e.g. concrete).
- Small areas (-15sqm): use a sponge to apply the primer to the surface.
- Large areas: (15sqsm+): use a microfiber mop to evenly apply the primer to the surface.
- Avoid puddling, skinning and streaks.
- Apply at normal temperature range of 21°C and 50% relative humidity; higher temperatures shorten and lower temperatures lengthen these times.
- Application of Swiss GriP® may resume immediately after the primer has cured. Do not use cleaning agents after applying Swiss GriP Primer. Apply Swiss GriP within 8 hours after applying Swiss GriP Primer.

I’m Step 3. Preparation
Set up your mixing station at an appropriate area.
- Use a drop cloth to protect floors from splatters/spills
Required tools not supplied
- Roller handle
- Paint tray
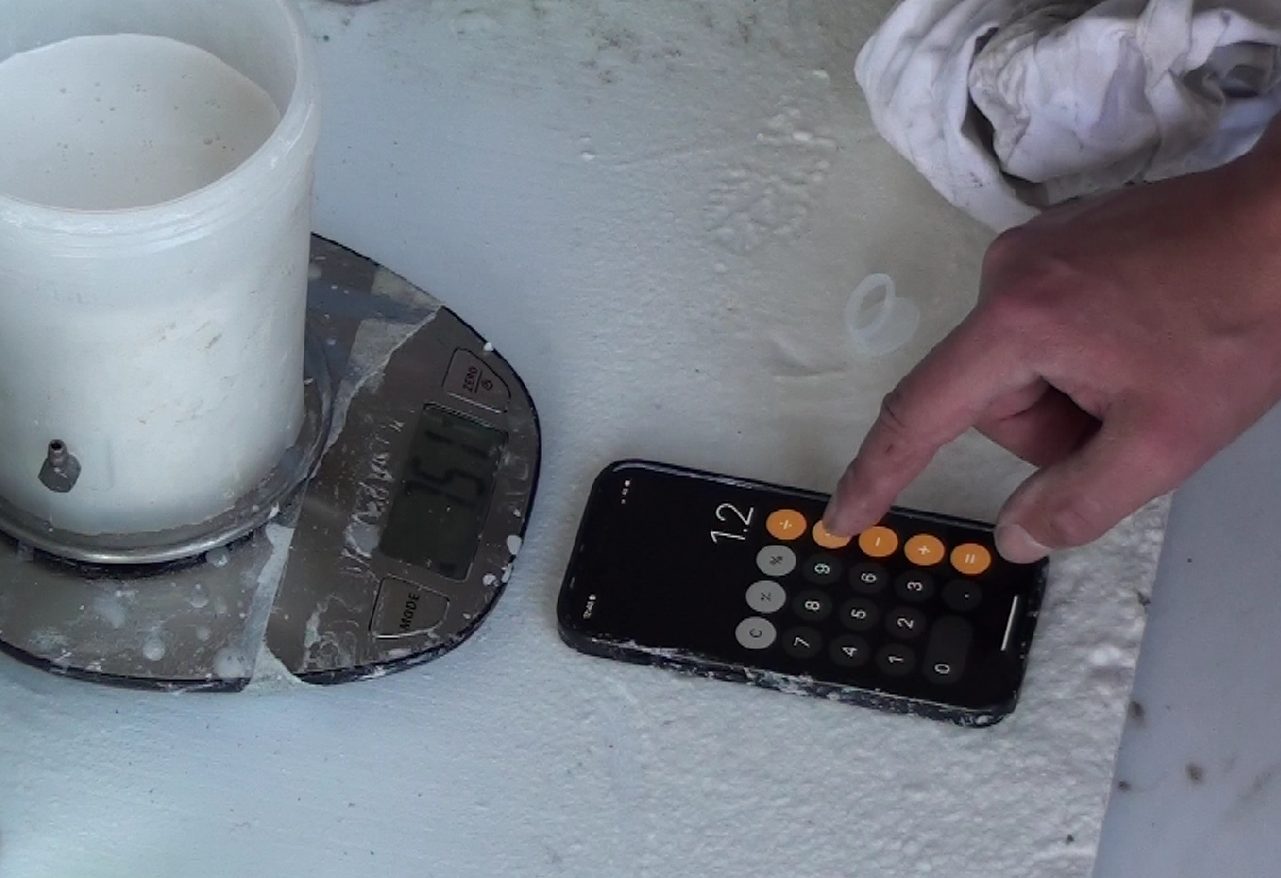
- Electrical precision scale (e.g.. digital kitchen scale)
- Clean mixing cup
- Cordless electric drill
- Two mixing heads. One to stir up Part A and the second (clean one) to mix Part A and B together (COMPULSORY)
- Cloth or paper towels
- IMPORTANT: It is compulsory to mix Part A and Part B with an electric drill and mixer. Shaking is not sufficient to get a good mixture. Only mix manually for smaller quantities (less than 300 grams Part A).
Coating Preparation
- Stir Swiss GriP Part A thoroughly before use with an electrical mixer. Make sure to mix in any material on bottom or sides of the bucket. Particles can “swim” on top of the surface or move down.
- A newly opened bucket needs to be stirred up for at least 5 minutes but might require more time to be stirred well.
- Stir up Part A every time prior to taking more material.

4. Mixing Swiss GriP Components
Mixing Ratio: 5 to 1.
- For every 5 parts of Coating A, add 1 part of Hardener B.
- Only mix as much coating as will be immediately required. Once coating has been mixed, apply within 20 minutes.
- Place mixing cup on the precision scale and turn on. Thoroughly stir up Part A and pour in mixing cup.
- Add the required amount of Hardener B.
- Stir mixture thoroughly with a clean electric stiller. Stirring is essential, shaking will not mix the two parts together.
Calculating Mixture
- Use the following formula to calculate how much Hardener B is required:
A x 1.2, where A is the amount of Coating A in grams in the mixing cup.
Example 1
-
- You have poured 150 grams of Coating A in your mixing cup. How much Hardener needs to be added?
Multiply 150 by 1.2. The result is 180.
This means you have to add 30 grams of Hardener B until your scale indicates 180 grams.
- You have poured 150 grams of Coating A in your mixing cup. How much Hardener needs to be added?
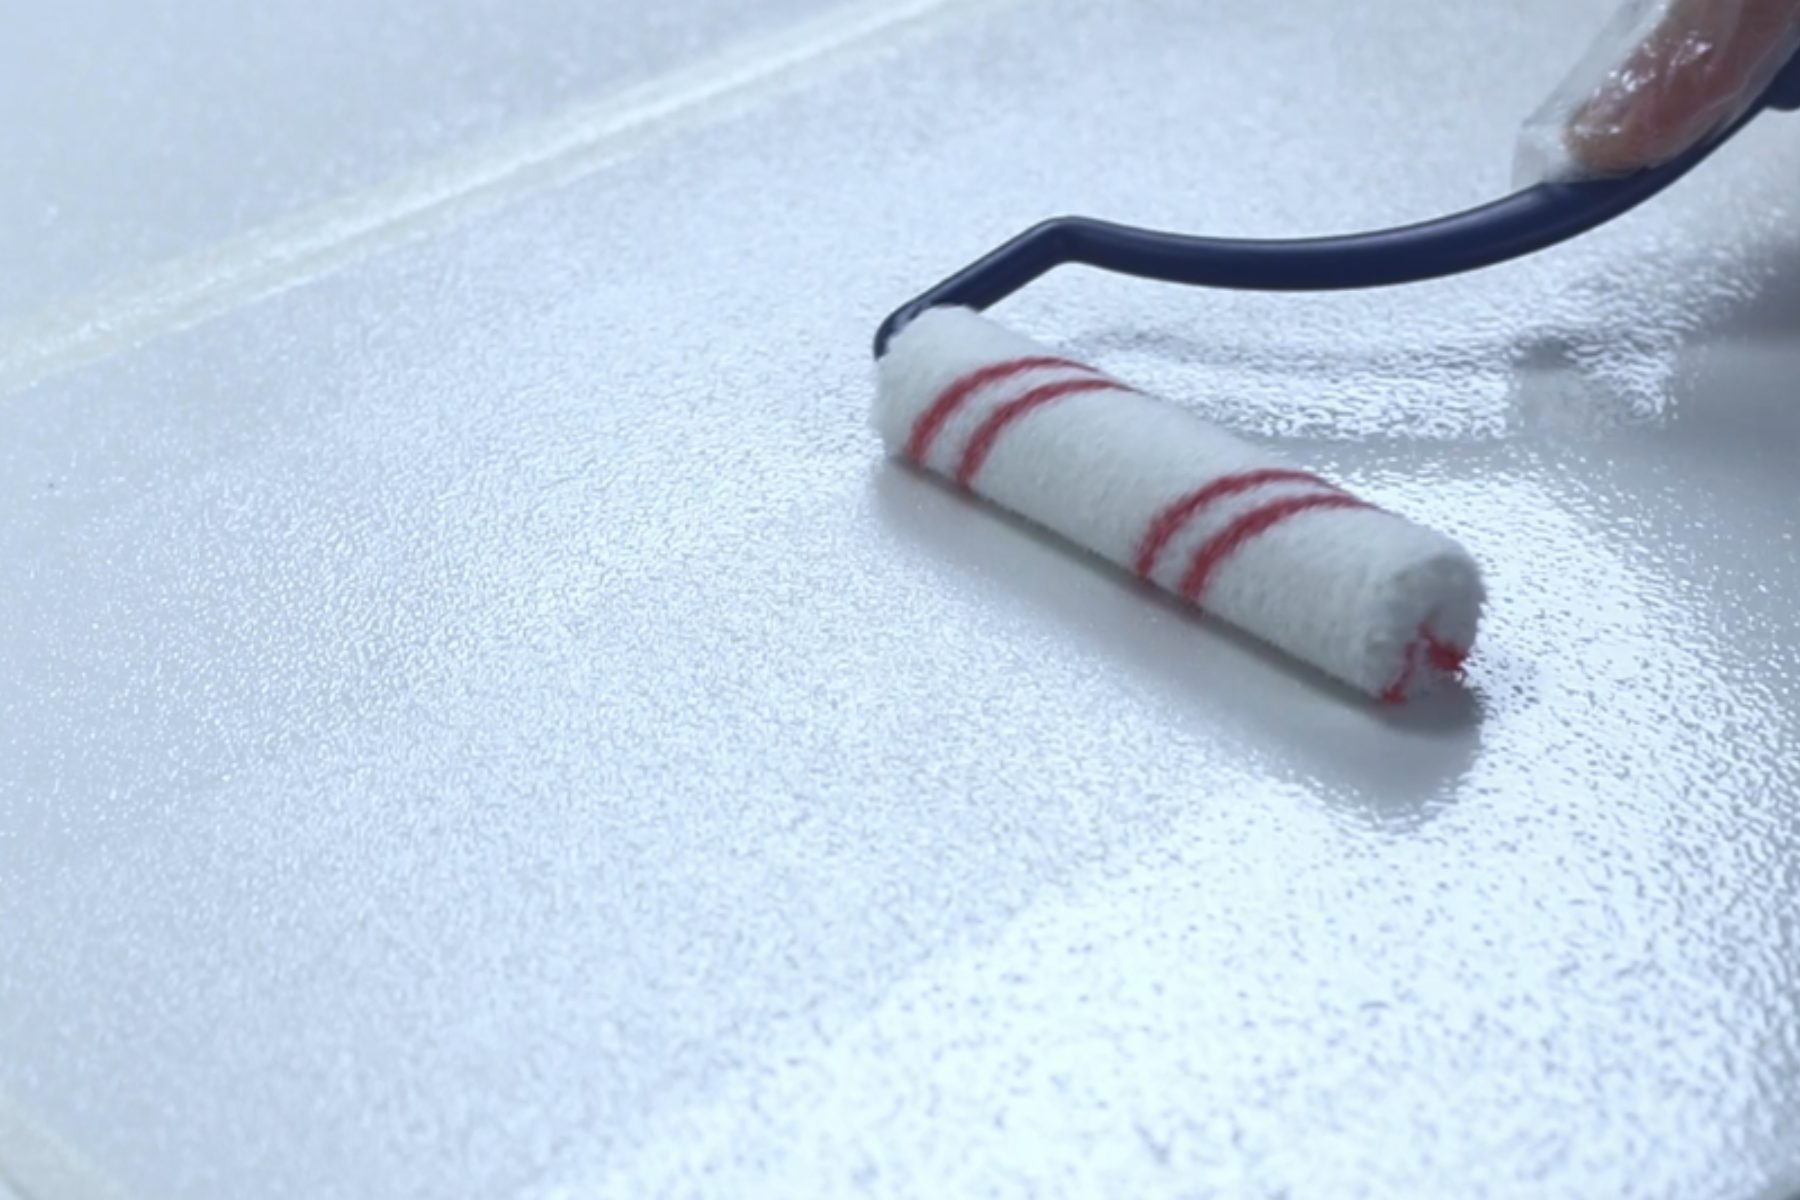
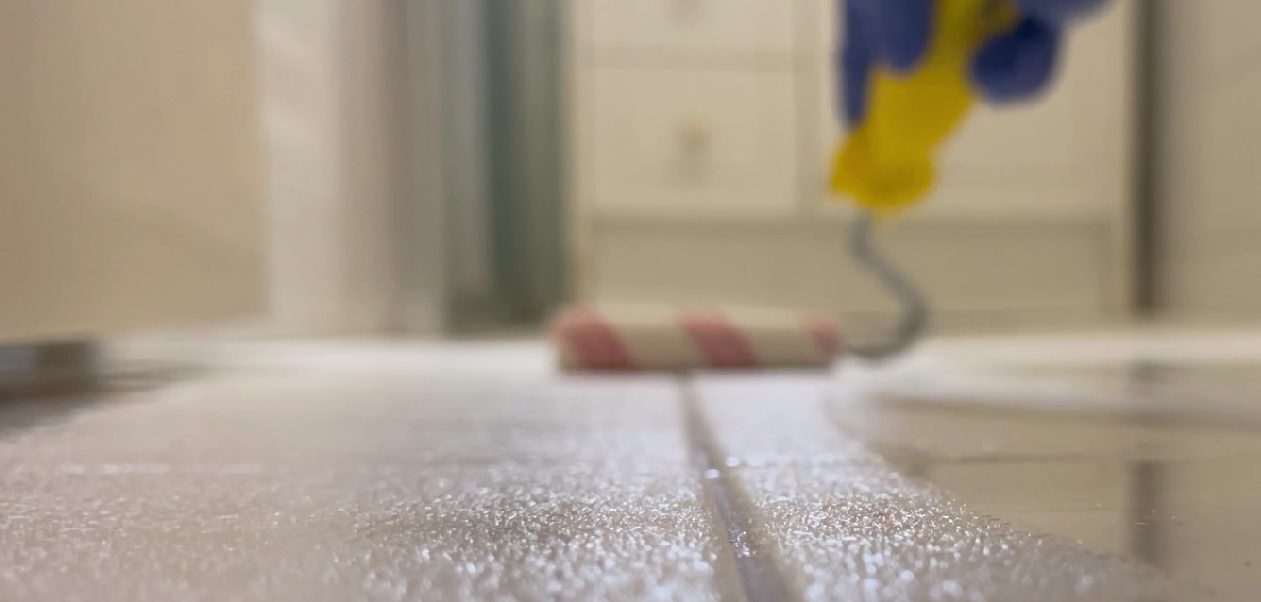
5. Roller Application
Only use Swiss GriP Application Rollers or short, 4mm NAP rollers. Using unsuitable rollers can cause roller marks and application of too much material. ATTENTION: Keep stirring the mixture in the cup and paint tray before loading up the roller. Repeat this throughout the application process.
- Pour mixture of Part A and Hardener B in a clean paint tray.
- To allow the painting of straight lines along edges, it is recommended to use an appropriate masking tape.
- Apply a single, uniform layer to the surface.
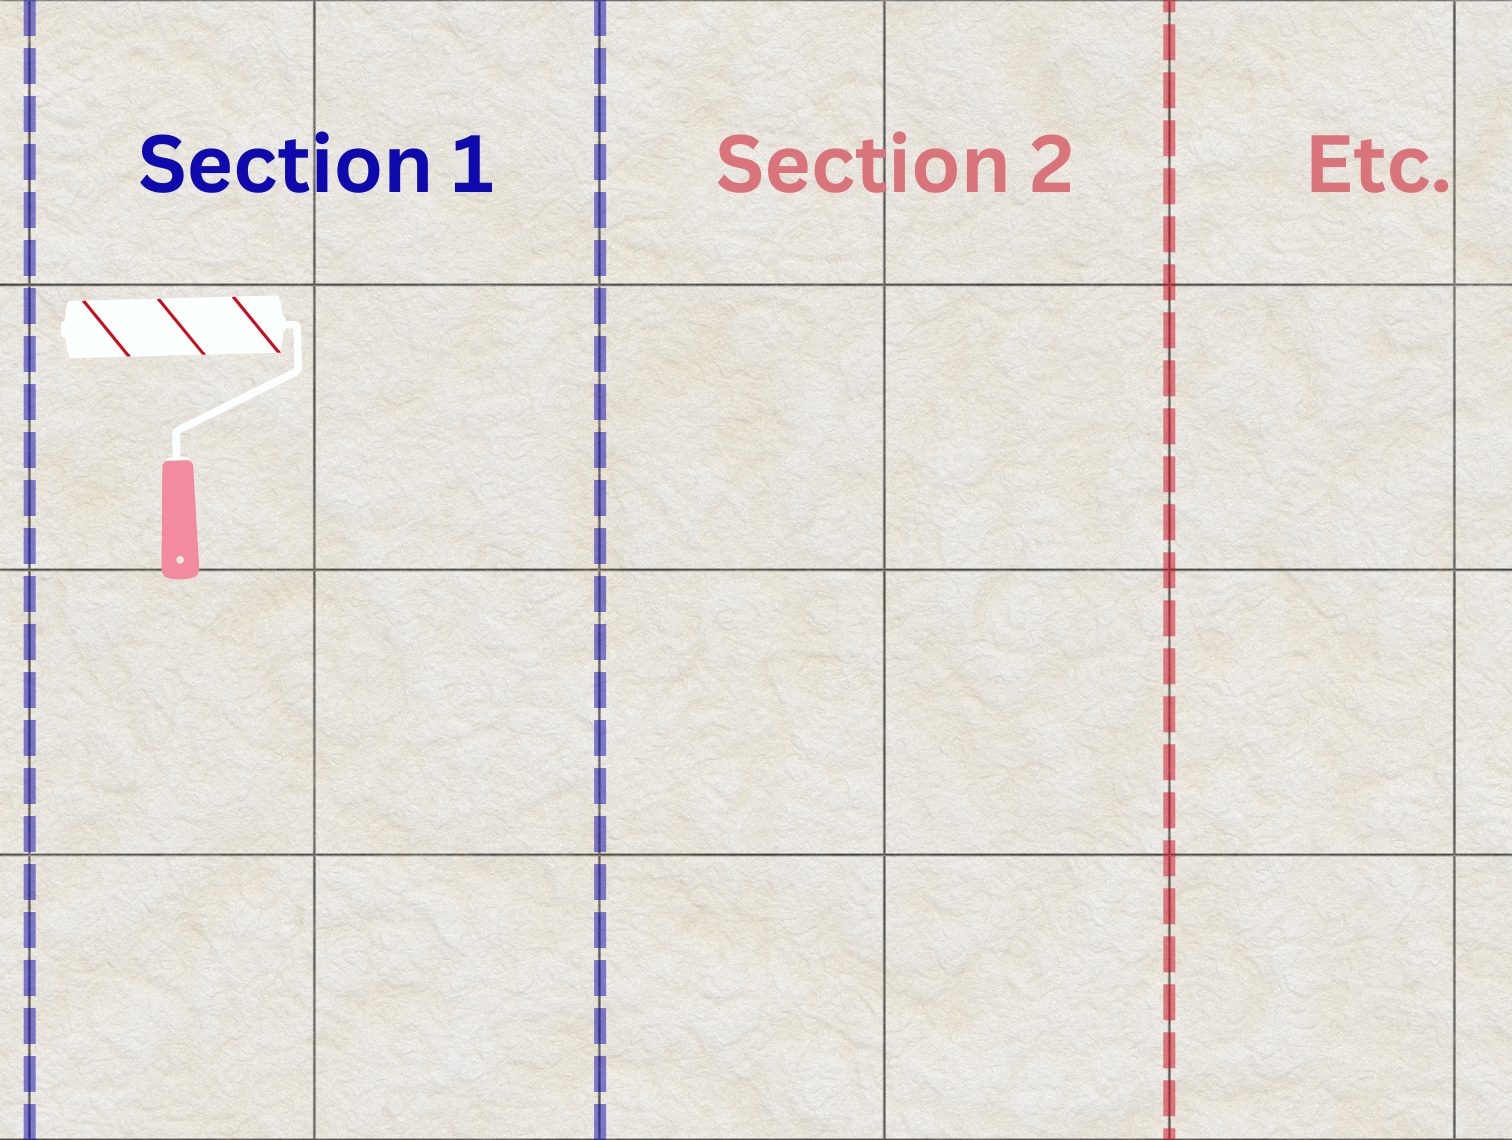
- Divide larger areas in smaller sections of 0.5 to 1m2. For example; create sections of 2 up to 8 tiles, using the grouts as outer edge. Avoid rolling over the section edge as this will lead to a double layer when completing that section.
Note: Avoid applying double coats, which can cause the coating to cure translucent instead of transparent. Spread out material by going cross-wise over the surface without adding material.
- Avoid the roller to become ”dry” during the application, load up more material if required.
- Theoretical spreading rate is approx. 62 to 70 grams per square metre. Practical spreading rates will vary depending on such factors as method and conditions of applications and surface porosity.
6. Curing
The Swiss GriP Non-Slip coating needs to cure for at least 12 hours. After 12 hours, light foot traffic is possible. Read TDS for full curing times and follow our Technical Advice and Maintenance Instructions for cleaning instructions.
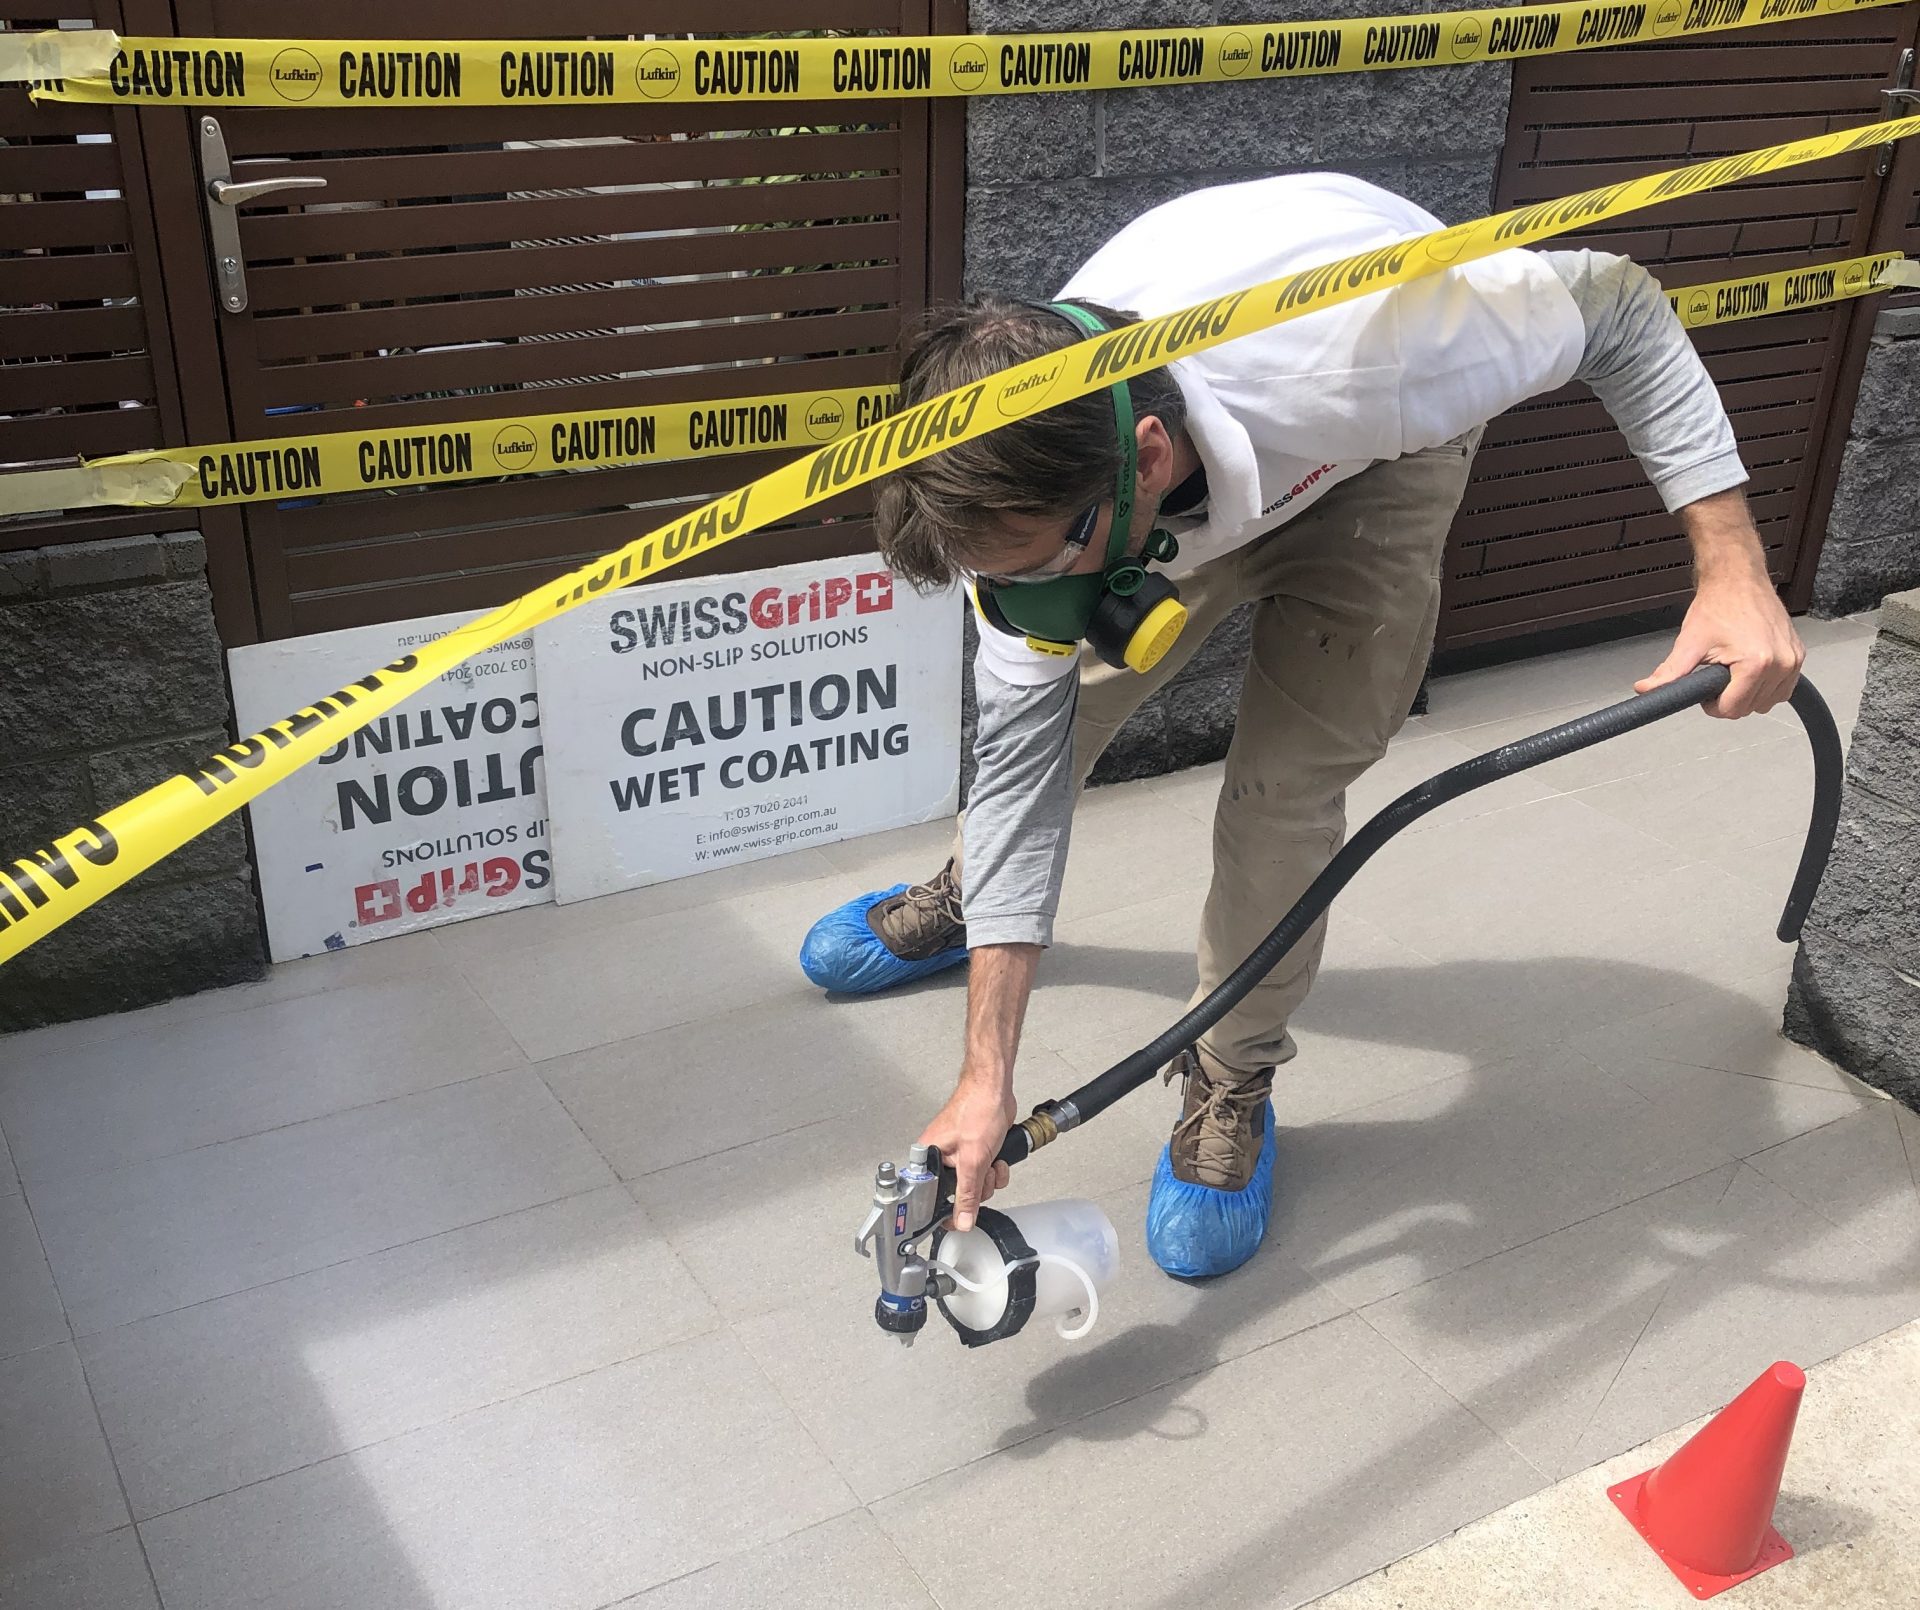
7. Spray Application
Important: Contact our customer service prior to applying Swiss GriP by spray gun.
Safety: Wear appropriate PPE.
Swiss GriP can be applied with an Ozito 400W Power Paint Spray Gun (approx. $45.-), Wagner XVLP FC3500 (approx. $700.-) and a Graco HVLP 9.0 Sprayer (approx. $3000.-) or conventional 1.3 – to 1.6 mm nozzle spray guns with 3 bar air pressure. Do not apply with sprayers with smaller nozzles (will cause blockage).
- Mask any sensitive areas before spraying.
- Make sure to follow the instructions of the specific spray gun carefully. Always clean sprayer directly after use.
- Always do a sample application to adjust air pressure and material flow.
- Practical spreading rates will vary depending on such factors as method, spray gun, over spray, and conditions of applications and surface roughness.
- Hold a distance of about 20cm from the surface.
- Use an overlapping spray method or a cross-wise application.
Theoretical Spreading Rates
- Wet condition: 62 to 75 grams per m2
- Dry condition: 20 to 30 grams per m2
Contact Us In Case of Any Questions
Disclaimer: The data provided within the Swiss GriP Non-Slip system is correct at the time of publication, however it is the responsibility of those using this information to check that it is current prior to specifying or using any of these coating/product systems.: Any advice, recommendation, information, assistance or service provided by any of the divisions of Swiss GriP Australia Pty Ltd or its related entities (GriP Safety Coatings AG) in relation to goods manufactured by it or their use and application is given in good faith and is believed by Swiss GriP to be appropriate and reliable. Coating/product systems can be expected to perform as indicated on the spec sheet so long as applications and application procedures of the individual products are followed as recommended on the appropriate Product data Sheet. Customers are encouraged to make their own enquiries as to the material’s characteristics and, where appropriate, to conduct their own tests in the specific context of the material’s intended use.